Difference between revisions of "Wiegand-26"
| Line 32: | Line 32: | ||
== ESP Easy == | == ESP Easy == | ||
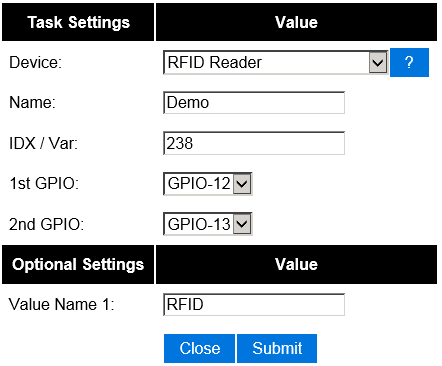
| − | Use the device tab on the ESP Easy webinterface and create a new task by editing one of the available tasks. Select "RFID Reader" from the dropdown box | + | Use the device tab on the ESP Easy webinterface and create a new task by editing one of the available tasks. Select "RFID Reader" from the dropdown box. |
| + | |||
| + | [[File:EasyConfigRFID.png]] | ||
| + | |||
| + | Enter the IDX found in the Domoticz device page. Also select the two GPIO pin that you have used to connect the reader. That should be all. | ||
== ESP Connexio == | == ESP Connexio == | ||
Revision as of 07:52, 3 October 2015
Contents
Introduction
The ESP can also be used to read out RFID Tag Readers that are using the Wiegand-26 protocol.
The RFID reader has to be connected to two GPIO pins on the ESP module. The ESP uses an interrupt routine to decode the Wiegand-26 bitstream. The RFID reader will send a message to your Home Automation controller containing the unique RFID Tag ID.
Hardware


The Wiegand-26 RFID TAG Reader can be found on eBay. Please note that the outputs uses 5 volts signals and they should not directly be connected to the ESP. Use a level shifter!
This is just a sample of an RFID reader using the Wiegand-26 protocol.
This Wiegand-26 RFID Reader works with tags compliant with EM4001 ISO standard, on a frequentie of 125kHz.
Connections
WARNING: The unit uses 5 volt signals that can not be used on the ESP module. You must use a levelshifter!!!
The reader needs at least 6 volts. Do not connect VCC to the VCC on the ESP!!! (The unit will turn on at 5 volts, the led will turn on, but detection of RFID tags will fail!)
 Wiegand 	ESP-01
 Black 	GND
 Red   	6-12 Volt
 Green		GPIO 0 (via levelshifter!!!)
 White		GPIO 2 (via levelshifter!!!)
Software
Custom Sketch
todo
ESP Easy
Use the device tab on the ESP Easy webinterface and create a new task by editing one of the available tasks. Select "RFID Reader" from the dropdown box.

Enter the IDX found in the Domoticz device page. Also select the two GPIO pin that you have used to connect the reader. That should be all.
ESP Connexio
On the ESP Conneexio, the following event will appear:
RFID <reader nr>,<tag id>
| Parameter: | Description: | Range: | Remarks: |
|---|---|---|---|
| reader nr | Nummber of the tag reader that is connected | 1 of 2 | |
| tag id | Unique TAG ID | 1..2^26 |
Sample
RFIDWG 1,0x1234AB
Sample eventlist entry:
RFIDWG 1,0x1234AB; ??;