|
|
| Line 1: |
Line 1: |
| − | [[Bestand:ESPEasy1.png|320px]] | + | [[File:ESPEasy1.png|320px]] |
| − | = Introductie = | + | = Introduction = |
| − | De ESP Easy is een firmware versie voor de ESP module waarmee je snel en eenvoudig een plug and play sensor voor Domoticz kan realiseren.
| + | The ESP Easy firmware can be used to turn the ESP module into a plug & play sensor/actuator device for Home Automation solotions like Domoticz. |
| | | | |
| − | Na het laden van de firmware kun je op verschillende manieren de configuratie instellen naar eigen behoeftr. Het is ook mogelijk om deze configuratie al direct in de sketch te zetten. Dan is verdere configuratie niet meer nodig. Aanpassen na het uploaden kan via Serial of via de webinterface.
| + | The firmware is entirely web based. |
| | | | |
| − | = Configuratie = | + | = Configuration = |
| − | == via de sketch ==
| |
| − | Het is mogelijk om alle benodigde settings al in de sketch op te nemen. Hiervoor pas je onderstaande settings aan. Dit is niet verplicht, je kunt dit ook later via serial uitvoeren.
| |
| | | | |
| − | #define DEFAULT_SSID "ssid" // Enter your network SSID
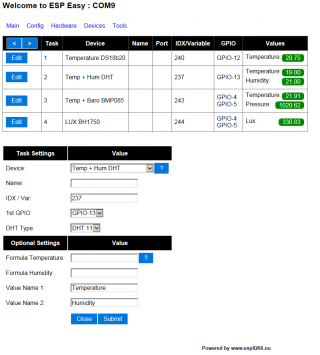
| + | The ESP Easy has a userfriendly web interface for all configuration settings. After initial upload the ESP does not have a valid SSID and WPA key and it will start in Access Point mode with the WPA key "configesp" |
| − | #define DEFAULT_KEY "wpakey" // Enter your network WPA key
| |
| − | #define DEFAULT_SERVER "192.168.0.8" // Enter your Domoticz Server IP address
| |
| − | #define DEFAULT_PORT 8080 // Enter your Domoticz Server port value
| |
| − | #define DEFAULT_DELAY 60 // Enter your Send delay in seconds
| |
| − | #define DEFAULT_DALLAS_IDX 0 // Enter IDX of your virtual temperature device
| |
| − | #define DEFAULT_DHT_IDX 0 // Enter IDX of your virtual Humidity device
| |
| − | #define DEFAULT_DHT_TYPE 11 // Enter Type of your virtual Humidity device
| |
| − | #define DEFAULT_BMP_IDX 0 // Enter IDX of your virtual Barometric Pressure device
| |
| − | #define DEFAULT_LUX_IDX 0 // Enter IDX of your virtual LUX device
| |
| − | #define DEFAULT_RFID_IDX 0 // Enter IDX of your virtual RFID device
| |
| − | #define DEFAULT_ANALOG_IDX 0 // Enter IDX of your virtual Analog device
| |
| | | | |
| − | == via serial ==
| + | Connect with your laptop or tablet to ip 192.168.4.1 and enter the config tab to change SSID and WPA key. Now reboot the device and it should join your own local network. |
| − | Geef na het booten het command "settings". Je krijgt dan onderstaand scherm te zien:
| |
| | | | |
| − | Generic settings
| + | == Sample Dallas sensor == |
| − | Version :1
| + | From the config tab, first enter the IP address and port of your local Domoticz Server. |
| − | Unit :1
| |
| − | WifiSSID :ssid
| |
| − | WifiKey :wpakey
| |
| − | ServerIP :192.168.0.8
| |
| − | ServerPort:8080
| |
| − | Delay :60
| |
| | | | |
| − | Device settings
| + | Within Domoticz you have to first create virtual hardware (dummy) and then create a virtual device of type "temperature". Check which IDX is allocated for this device by Domoticz. From within the web interface on the ESP, click on the device tab and select "edit" on the first row. Select "Dallas Temperature sensor" and enter the IDX found in Domoticz earlier. |
| − | Dallas :0
| |
| − | DHT :0
| |
| − | DHTType :11
| |
| − | BMP :0
| |
| − | LUX :0
| |
| − | RFID :0
| |
| − | Analog :0
| |
| − | | |
| − | Je moet in elk geval de WifiSSID en WifiKey aanpassen naar jouw eigen Wifi netwerk. Daarna met het commando "save" de settings in eeprom opslaan en de ESP opnieuw opstarten.
| |
| − | Dat zou voldoende moeten zijn om de eerste verbinding te leggen.
| |
| − | | |
| − | == via de webinterface ==
| |
| − | Vanaf R003 beschikt de ESP Easy over een webinterface voor de configuratie. Een verse ESP heeft geen SSID en zal nu automatisch opstarten als en Wifi Access Point met de naam ESP_1 en de default WPA key op IP adres 192.168.4.1. Maak dus verbinding met je laptop/tablet/smartphone met dit Access Point en start een webbrowser naar 192.168.4.1.
| |
| − | | |
| − | Je ziet dan als het goed is een eenvoudige webinterface waarop je o.a. de Wifi settings voor je eigen netwerk kunt instellen. Dat is stap 1. Na het instellen click je op connect en de ESP zal verbinding gaan maken met je eigen Wifi netwerk. Krijgt dan automatisch via DHCP een IP adres en dit wordt getoond in de webinterface. Schakel nu over naar het nieuwe IP adres.
| |
| − | Vervolgens kun je devices instellen en het geheel op gang brengen richting Domoticz.
| |
| − | | |
| − | | |
| − | == Voorbeeld Dallas sensor ==
| |
| − | In Domoticz maak je eerst virtual hardware aan (dummy) en dan een virtuel device van het type "temperatuur". Kijk welk IDX is toegekend door Domoticz. Dit vullen we in bij de settings van ESP Easy. Stel het IDX is 23 dan geven we het commando:
| |
| − | | |
| − | Dallas 23
| |
| − | | |
| − | Vanaf dat moment zal de ESP Easy de Dallas sensor gaan uitlezen en de informatie versturen naar Domoticz.
| |
| − | | |
| − | = Aansturen devices =
| |
| − | == LCD ==
| |
| − | Het LCD display kan worden aangestuurd via http, zie het volgende commando voorbeeld:
| |
| − | | |
| − | <nowiki>http://<ip van je ESP module>/?cmd=LCDWrite%201,1,Welcome_ESPUser</nowiki>
| |
| − | Tekst wordt op regel 1, positie 1 getoond
| |
| − | | |
| − | == MCP IO expander ==
| |
| − | Je kunt alle 16 output pinnen bedienen van deze unit via http commando's. Deze kun je in Domoticz opnemen bij een switch device. Voorbeeld het inschakelen van pin 1:
| |
| − | | |
| − | <nowiki>http://<ip van je ESP module>/?cmd=ExtWiredOut%201,1</nowiki>
| |
| | | | |
| | = Logging = | | = Logging = |
| | | | |
| − | Voorbeeld:
| + | Sample: |
| | | | |
| | DS : Temperature: 21.12 | | DS : Temperature: 21.12 |
| Line 103: |
Line 47: |
| | HTTP : Closing connection | | HTTP : Closing connection |
| | | | |
| − | = Firmware laden = | + | = Loading firmware = |
| | todo... | | todo... |
| | | | |
| − | bin files op ftp server?
| + | = Connections = |
| − | | |
| − | esptool voorzien van gui ?
| |
| − | | |
| − | = Aansluitingen = | |
| | | | |
| | = ? = | | = ? = |
Introduction
The ESP Easy firmware can be used to turn the ESP module into a plug & play sensor/actuator device for Home Automation solotions like Domoticz.
The firmware is entirely web based.
Configuration
The ESP Easy has a userfriendly web interface for all configuration settings. After initial upload the ESP does not have a valid SSID and WPA key and it will start in Access Point mode with the WPA key "configesp"
Connect with your laptop or tablet to ip 192.168.4.1 and enter the config tab to change SSID and WPA key. Now reboot the device and it should join your own local network.
Sample Dallas sensor
From the config tab, first enter the IP address and port of your local Domoticz Server.
Within Domoticz you have to first create virtual hardware (dummy) and then create a virtual device of type "temperature". Check which IDX is allocated for this device by Domoticz. From within the web interface on the ESP, click on the device tab and select "edit" on the first row. Select "Dallas Temperature sensor" and enter the IDX found in Domoticz earlier.
Logging
Sample:
DS : Temperature: 21.12
HTTP : Connecting to 192.168.0.8
HTTP : Requesting URL: /json.htm?type=command¶m=udevice&idx=113&svalue=21.12
HTTP : Succes!
HTTP : Closing connection
DHT : Temperature: 22.00
DHT : Humidity: 19.00
HTTP : Connecting to 192.168.0.8
HTTP : Requesting URL: /json.htm?type=command¶m=udevice&idx=148&svalue=22.0
HTTP : Succes!
HTTP : Closing connection
LUX : Light intensity: 720.00
HTTP : Connecting to 192.168.0.8
HTTP : Requesting URL: /json.htm?type=command¶m=udevice&idx=149&svalue=720.0
HTTP : Succes!
HTTP : Closing connection
ADC : Analog value: 556
HTTP : Connecting to 192.168.0.8
HTTP : Requesting URL: /json.htm?type=command¶m=udevice&idx=150&svalue=556.0
HTTP : Succes!
HTTP : Closing connection
RFID : Tag : 12445313
HTTP : Connecting to 192.168.0.8
HTTP : Requesting URL: /json.htm?type=command¶m=udevice&idx=151&svalue=12836313.0
HTTP : Succes!
HTTP : Closing connection
Loading firmware
todo...
Connections
?
