I am working on creating some scene controller switches that basically use a 2x4matrix keypad with 4 LEDs and am wondering what the easiest/cheapest approach for this would be. The microcontroller I plan on using is the Seed Studio ESP32 C3 board. For the keypad I thought of creating a resistor network across the swtches and feeding that to an analog input, but don't know if there is a better way of doing this. The switches will be 4 sets of on/off switches. The LEDs will be indicators to tell if a set of on/off switches is toggled to the on or off state I am not opposed to using rules to get the desired result. I will then be sending the actions over MQTT to Home Assistant.
Any help is greatly appreciated.
Creating some scene controller switches
Moderators: grovkillen, Stuntteam, TD-er

Re: Creating some scene controller switches
I'd suggest to use a digital matrix keypad, as can quite easily be constructed by using P061 - Keypad PCF8574/MCP23017/PCA8575. Using a MCP23017 board gives you the greatest flexibility as it can support up to 72 keys/buttons using a single board and doesn't require pull-up resistors, and a second MCP23017 board allows you to control up to 16 LEDs, and adding an extra board gives you 16 more LEDs. Up to 8 of these boards can be configured on a single I2C bus (ESPEasy only supports 1 I2C bus). And connecting these boards to your controller only requires 2 GPIO pins, as they connect using I2C.
If you would want to use (many) more LEDs, or require multi-color leds, then using a Neopixel stripe (supporting 24 bit color!) allows to control dozens of them via a single GPIO pin, but that will require a more serious power supply, as these Neopixels can produce a lot of light, but then use a rather high current (that you won't need, of course).
If you would want to use (many) more LEDs, or require multi-color leds, then using a Neopixel stripe (supporting 24 bit color!) allows to control dozens of them via a single GPIO pin, but that will require a more serious power supply, as these Neopixels can produce a lot of light, but then use a rather high current (that you won't need, of course).
/Ton (PayPal.me)
Re: Creating some scene controller switches
Ath, Thanks for the reply, I was looking at some of those options, but I don't need support for 72 buttons. I am only using 8. As for the LEDs I only need 4.The PCF8574 MIGHT be an option, but I would want it to be a minimalist design. That's why I was thinking of the resistor matrix as a possible option on the keypad buttons which would use a single analog input pin leaving plenty of pins to use for the 4 LEDs. Key presses would return values in the 0 to 255 range and I would only need to figure out what values corresponded to what buttons. I need to make the design pretty compact as it will be fitting in a US single gang light switch box on a wall. I am also looking at keeping the cost as low as I can.
Re: Creating some scene controller switches
The analog capabilities of the ESP are not that bad, but getting a quality resistor network/ladder circuit can be a challenge.
When only having 8 buttons and 4 LEDs, you can use a single MCP23017, and, as they are supported by ESPEasy as core GPIO input/outputs, you can use the Monitor command to 'watch' a couple of the pins for input, and use MCPGPIO commands to turn the LEDs on other pins on and off. That would be quite minimalistic, and still be digital .
.
When only having 8 buttons and 4 LEDs, you can use a single MCP23017, and, as they are supported by ESPEasy as core GPIO input/outputs, you can use the Monitor command to 'watch' a couple of the pins for input, and use MCPGPIO commands to turn the LEDs on other pins on and off. That would be quite minimalistic, and still be digital
/Ton (PayPal.me)
Re: Creating some scene controller switches
I see you mentioned the MCP23017 again. You mention that it is supported by ESPEasy, but to that end, the PCF8574 is also supported. As mentioned though, space, ease of build and price are factors. Not saying that the MCP23017 is expensive, but it's use gets iffy based on it's size if used in a DIP package, or ease of build if going SMT. The keypad layout in the link below is kind of what I was thinking for the resistor method. Being that I would only be using 8 buttons the resistors could be changed to give more spacing for the voltages created for the ADC and thus making it easier to detect which button is pressed. Do you know of any good documentation for using the PCF8574 with a keypad though so I can do a better comparrison?
https://hackaday.com/2021/06/09/improve ... r-keypads/
https://hackaday.com/2021/06/09/improve ... r-keypads/
Re: Creating some scene controller switches
Sure, you can also use a PCF8574 if that better fits your build-space.
If you are going for that resistor matrix design, then all you need would be a couple of small components to achieve that, next to some LEDs with resistors, and the ESP32C3 should have enough GPIO pins to control all that. It's a very nice follow-up board for the ESP8266, and can also be obtained in rather small packages
If you are going for that resistor matrix design, then all you need would be a couple of small components to achieve that, next to some LEDs with resistors, and the ESP32C3 should have enough GPIO pins to control all that. It's a very nice follow-up board for the ESP8266, and can also be obtained in rather small packages
/Ton (PayPal.me)
Re: Creating some scene controller switches
I purchased 3 of the Seed Studio ones to try out. They are 18mm x 22mm so very small. I was able to get ESPEasy flashed to one for testing. I currently just have a basic resistor/LED connevted to test MQTT, and it works really well. On many of the other ESP32 modules, the antenna is integrated onto the PCB, but these have a small external antenna that has a sticky backed tape to mount it to something.
Re: Creating some scene controller switches
That's one of the features we like so much on these units
/Ton (PayPal.me)
Re: Creating some scene controller switches
Don't use resistors to detect keys.
This is really hard to do it right for more than 2 or 3 buttons.
Problem is that you have to deal with noise and the fact that buttons will not act as "binary" as you might think they do.
This way you are left with not that many usable different voltage levels and can still determine which key is pressed.
There is a reason keypads almost always are laid out in a matrix with diodes.
And there are lots of chips available to help making keypad setups.
Also keep in mind not to use long wires from the buttons to the electronics and if wires are needed, please twist them like you also see in UTP network cables.
Re: Creating some scene controller switches
TD-er,
When I did this with my MySensors setup using an arduino Pro Mini, there is an actual library for the arduinos. The library accepts row and column inputs which are the 2 contacts of any of the switches. The way I understand it works is that it sends a scrolling scan signal over the row pins at a fast rate and then when a button is pressed, one of the column pins is interrupted either low or high and checks to see what row is active on the scan. I could be off on that though.
When I did this with my MySensors setup using an arduino Pro Mini, there is an actual library for the arduinos. The library accepts row and column inputs which are the 2 contacts of any of the switches. The way I understand it works is that it sends a scrolling scan signal over the row pins at a fast rate and then when a button is pressed, one of the column pins is interrupted either low or high and checks to see what row is active on the scan. I could be off on that though.
Re: Creating some scene controller switches
That's also how P061, that I mentioned above, worksdbemowsk wrote: ↑24 Jul 2023, 04:31 The way I understand it works is that it sends a scrolling scan signal over the row pins at a fast rate and then when a button is pressed, one of the column pins is interrupted either low or high and checks to see what row is active on the scan. I could be off on that though.
/Ton (PayPal.me)
Re: Creating some scene controller switches
And any other keyboard out there 
Re: Creating some scene controller switches
I ordered a pack of 5 PCF8574P chips that should be here Saturday. I will give them a shot this weekend.
Re: Creating some scene controller switches
So the PCF8574P chips arrived today. Is there some sort of schematic for wiring these to the keypad and an ESP device for use with ESPEasy?
Re: Creating some scene controller switches
I think I got this. I found the github page for the keypad code.
https://github.com/letscontrolit/ESPEas ... KeyPad.ino
It shows this which I think is mostly what I need.
// Connecting KeyPad matrix to PCF8574 chip:
// row 0 = GND (optional if 5 rows needed)
// row 1 = P0
// row 2 = P1
// row 3 = P2
// row 4 = P3
//
// column 1 = P4
// column 2 = P5
// column 3 = P6
// column 4 = P7
Correct me if I am wrong, but my kepad will hav 4 rows and 2 columns, so I would select the "PFC8574 (Matrix 5x4)" for the chip mode and then I can evaluate the ScanCode in the rules to perform whatever actions I need, correct?
Re: Creating some scene controller switches
So I have a positive update on my progress with this. I have my keypad connected to the PCF8574, which is then connected to the ESP32-C3 board via I2C on address 0x20. The keypad is a 4x2 matrix. I set the SCL and SDA pins under the hardware tab to be GPIO 6 and 7 respectively. I also have GPIO 6 and 7 to use the internal pull-up resistors. I also have rules enabled as that is how I am going to process the key presses/ScanCode values.
For my test setup I have 2 - Sonoff DualR3 modules configured with ESPEasy. The 2 relays on those are set up on GPIO 14 and 27. One device is on static IP 192.168.1.30 and the other is on 32. 4 of the buttons turn on and off the two relays on one Sonoff device, and the other 4 control the relays on the other Sonoff device. The following are the rules so far for the 8 buttons.
On keypad#ScanCode=17 Do
SendToHTTP,192.168.1.30,80,/control?cmd=gpio,27,0
Endon
On keypad#ScanCode=18 Do
SendToHTTP,192.168.1.30,80,/control?cmd=gpio,27,1
Endon
On keypad#ScanCode=33 Do
SendToHTTP,192.168.1.30,80,/control?cmd=gpio,14,0
Endon
On keypad#ScanCode=34 Do
SendToHTTP,192.168.1.30,80,/control?cmd=gpio,14,1
Endon
On keypad#ScanCode=49 Do
SendToHTTP,192.168.1.32,80,/control?cmd=gpio,27,0
Endon
On keypad#ScanCode=50 Do
SendToHTTP,192.168.1.32,80,/control?cmd=gpio,27,1
Endon
On keypad#ScanCode=65 Do
SendToHTTP,192.168.1.32,80,/control?cmd=gpio,14,0
Endon
On keypad#ScanCode=66 Do
SendToHTTP,192.168.1.32,80,/control?cmd=gpio,14,1
Endon
Later I will add the code in the On/Do loops to send the MQTT commands to Home Assistant. I will also be connecting 4 LEDs that will be indcators for the toggled on/off state of each row of keys.
Thank you to anyone who read this far in the post.
Re: Creating some scene controller switches
That's a good start, but there is some room for improvement here.dbemowsk wrote: ↑30 Jul 2023, 09:43 So I have a positive update on my progress with this. I have my keypad connected to the PCF8574, which is then connected to the ESP32-C3 board via I2C on address 0x20. The keypad is a 4x2 matrix. I set the SCL and SDA pins under the hardware tab to be GPIO 6 and 7 respectively. I also have GPIO 6 and 7 to use the internal pull-up resistors. I also have rules enabled as that is how I am going to process the key presses/ScanCode values.
For my test setup I have 2 - Sonoff DualR3 modules configured with ESPEasy. The 2 relays on those are set up on GPIO 14 and 27. One device is on static IP 192.168.1.30 and the other is on 32. 4 of the buttons turn on and off the two relays on one Sonoff device, and the other 4 control the relays on the other Sonoff device. The following are the rules so far for the 8 buttons.
On keypad#ScanCode=17 Do
SendToHTTP,192.168.1.30,80,/control?cmd=gpio,27,0
Endon
On keypad#ScanCode=18 Do
SendToHTTP,192.168.1.30,80,/control?cmd=gpio,27,1
Endon
On keypad#ScanCode=33 Do
SendToHTTP,192.168.1.30,80,/control?cmd=gpio,14,0
Endon
On keypad#ScanCode=34 Do
SendToHTTP,192.168.1.30,80,/control?cmd=gpio,14,1
Endon
On keypad#ScanCode=49 Do
SendToHTTP,192.168.1.32,80,/control?cmd=gpio,27,0
Endon
On keypad#ScanCode=50 Do
SendToHTTP,192.168.1.32,80,/control?cmd=gpio,27,1
Endon
On keypad#ScanCode=65 Do
SendToHTTP,192.168.1.32,80,/control?cmd=gpio,14,0
Endon
On keypad#ScanCode=66 Do
SendToHTTP,192.168.1.32,80,/control?cmd=gpio,14,1
Endon
Later I will add the code in the On/Do loops to send the MQTT commands to Home Assistant. I will also be connecting 4 LEDs that will be indcators for the toggled on/off state of each row of keys.
Thank you to anyone who read this far in the post.
- To avoid having to change umpteen lines with a new IP address, it is helpful to have a single place where that should be changed, in the event that would need to be changed
- ESPEasy also has the SendTo command, that communicates via the P2P network (UDP), and can send commands to any ESPEasy unit with a unique unit number (you have that configured, right?)
- Using GPIO pins of a remote unit in your rules on this unit seems not very flexible
First, lets abstract the remote device address:
(I'm assuming the last octet of the IP-addresses match the unit numbers)
Code: Select all
on ChangeSwitch do // 3 arguments: unit-number,'port',state
  if %eventvalue1% > 0
    SendTo,%eventvalue1%,"event,Switch%eventvalue2%=%eventvalue3%"
  endif
  // Handling LEDs or MQTT messages could also go here
endon
Code: Select all
On keypad#ScanCode=17 Do
  event,"ChangeSwitch=30,A,0"
Endon
On keypad#ScanCode=18 Do
  event,"ChangeSwitch=30,A,1"
Endon
On keypad#ScanCode=33 Do
  event,"ChangeSwitch=30,B,0"
Endon
On keypad#ScanCode=34 Do
  event,"ChangeSwitch=30,B,1"
Endon
On keypad#ScanCode=49 Do
  event,"ChangeSwitch=32,A,0"
Endon
On keypad#ScanCode=50 Do
  event,"ChangeSwitch=32,A,1"
Endon
On keypad#ScanCode=65 Do
  event,"ChangeSwitch=32,B,0"
Endon
On keypad#ScanCode=66 Do
  event,"ChangeSwitch=32,B,1"
Endon
Code: Select all
on SwitchA do
  gpio,27,%eventvalue1%
endon
on SwitchB do
  gpio,14,%eventvalue1%
endon
Edit: Fixed a typo in the 3rd code snippet.
Last edited by Ath on 31 Jul 2023, 08:31, edited 1 time in total.
/Ton (PayPal.me)
Re: Creating some scene controller switches
Ath,
This is amazing, and a game changer. I didn't know that ESPEasy had point to point UDP communication, much less how to utilize it. I do not have unit numbers configured, but that is now something that I am going to put in my spreadsheet where I am keeping track of the devices I am setting up along with their IPs and other information. Using the 4th octet as the unit number is a good starting place.
A question about your 3 little code snipets. The first snipet says to "apply that on your switch handlers". I am not sure what you mean by that. Is this something I would put in a rule? The other two lok like they should also go in the rules. Does the last snipet just get pasted right after the second one in the rules? Also, on the last snippet I am going to assume this is what you meant
with SwitchA being one relay on the Sonoff, and SwitchB being the second relay. You had both as SwitchA in your example.
This is amazing, and a game changer. I didn't know that ESPEasy had point to point UDP communication, much less how to utilize it. I do not have unit numbers configured, but that is now something that I am going to put in my spreadsheet where I am keeping track of the devices I am setting up along with their IPs and other information. Using the 4th octet as the unit number is a good starting place.
A question about your 3 little code snipets. The first snipet says to "apply that on your switch handlers". I am not sure what you mean by that. Is this something I would put in a rule? The other two lok like they should also go in the rules. Does the last snipet just get pasted right after the second one in the rules? Also, on the last snippet I am going to assume this is what you meant
Code: Select all
on SwitchA do
  gpio,27,%eventvalue1%
endon
on SwitchB do
  gpio,14,%eventvalue1%
endonRe: Creating some scene controller switches
OK, I played with it a bit and got it figured out. That does change the rules code quite a bit and makes it shorter and more compact. Thank you for all your help.
Here is the prototype of the new controller.
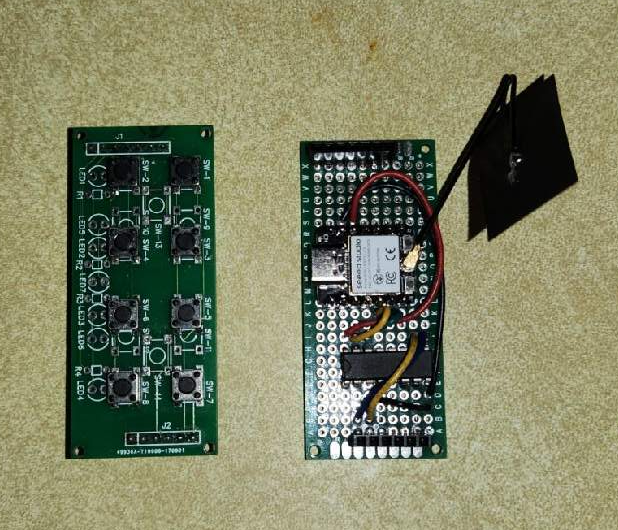
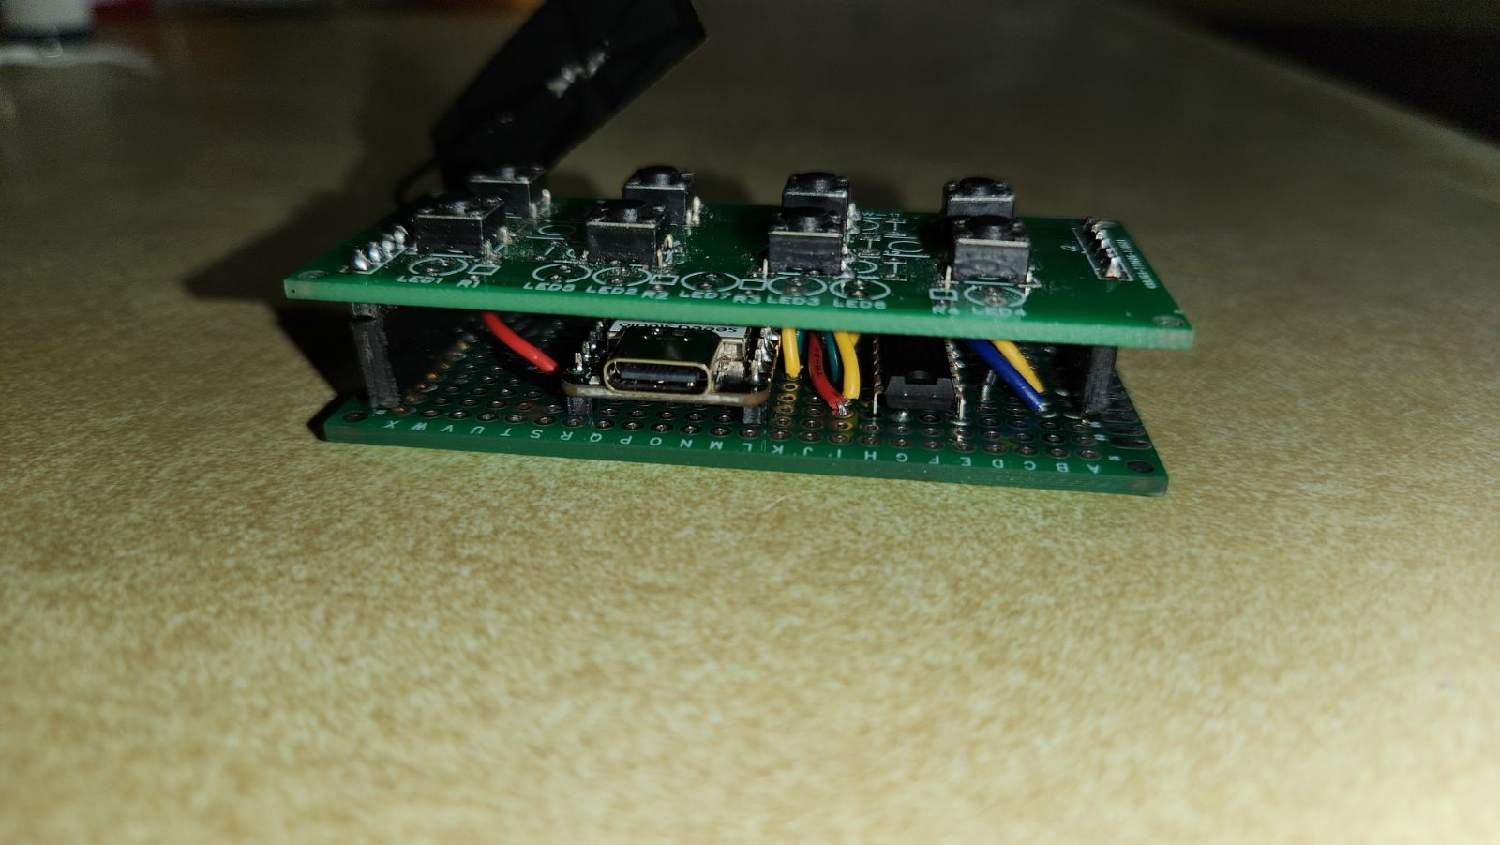
The actual keypad board that you see was one that I designed quite a few years ago when I was working with the MySensors project. I sill have some of the MySensors versions of these running today. This design is going to replace those. I will most likely design a new CPU board based on this new configuration I designed the keypad board to be set up in one of 3 different switch configurations.
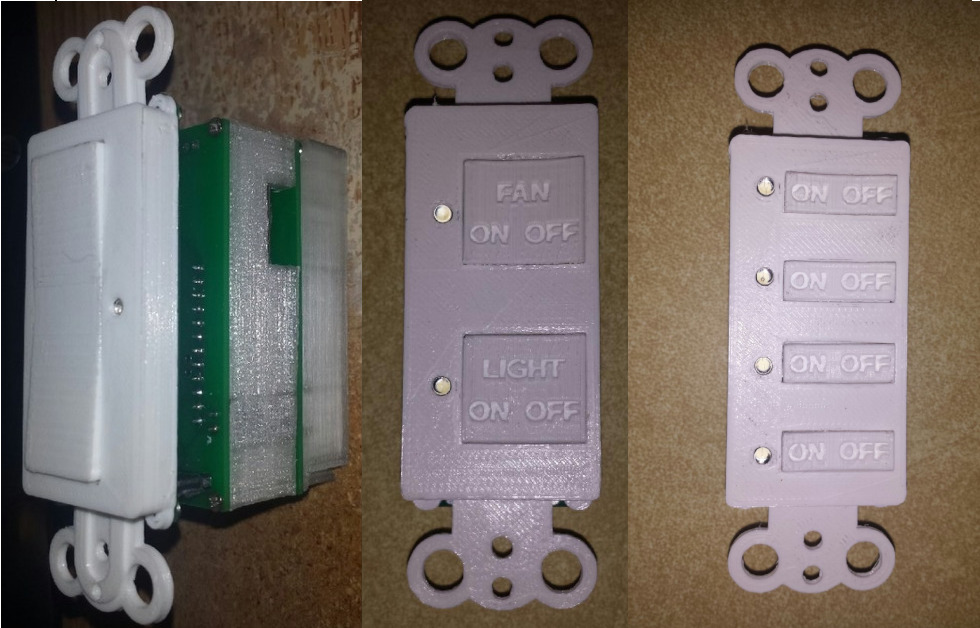
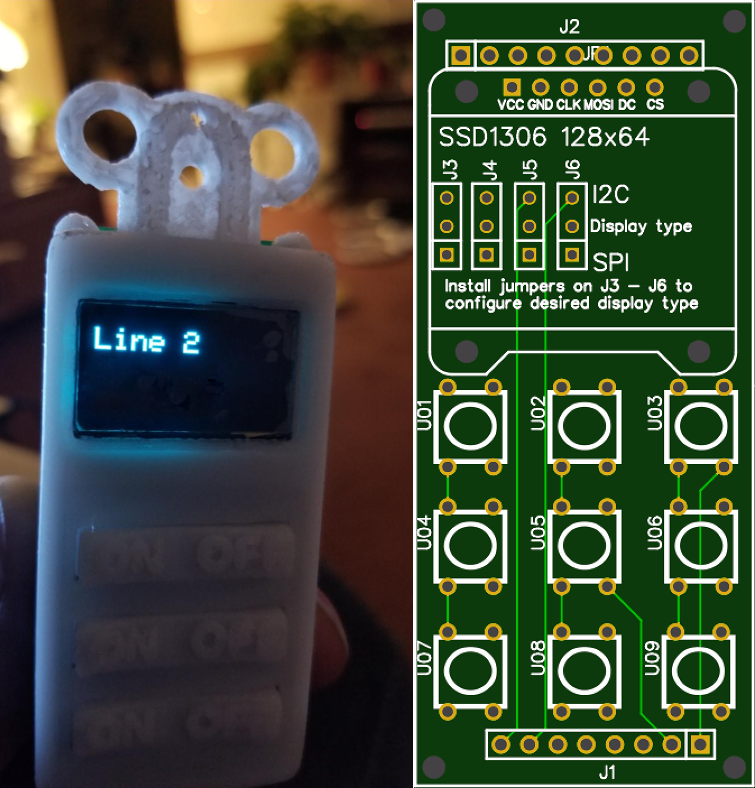
I did design another switch board that incorporated a small OLED display. Either one of the keypad designs could be stacked onto the processor board. I didn't really end up using this board for anything significant because the older MySensors controller board that I was using was just an arduino pro mini which I found didn't really have the horesepower for some of the things I was hoping to do with the display.
There was also a power supply board that went with this whole setup. This is 3 of the boards side by side with top and bottom views. The right most board was the first itteration of the power supply board. The latest revision incorporated an MOV that the firs one didn't have.
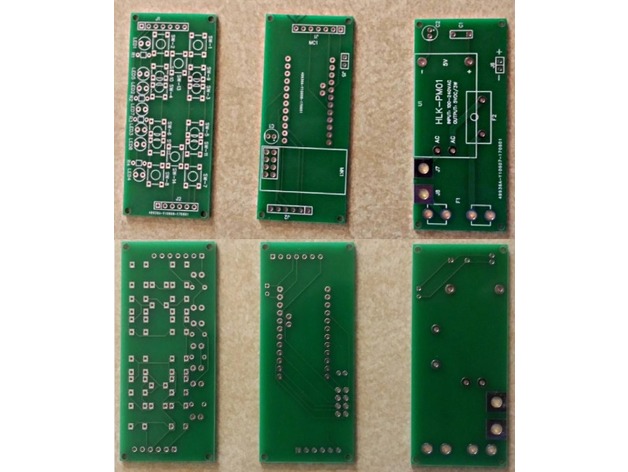
Anyway, enough of my rambling. I GREATLY appreciate your help.
Here is the prototype of the new controller.
The actual keypad board that you see was one that I designed quite a few years ago when I was working with the MySensors project. I sill have some of the MySensors versions of these running today. This design is going to replace those. I will most likely design a new CPU board based on this new configuration I designed the keypad board to be set up in one of 3 different switch configurations.
I did design another switch board that incorporated a small OLED display. Either one of the keypad designs could be stacked onto the processor board. I didn't really end up using this board for anything significant because the older MySensors controller board that I was using was just an arduino pro mini which I found didn't really have the horesepower for some of the things I was hoping to do with the display.
There was also a power supply board that went with this whole setup. This is 3 of the boards side by side with top and bottom views. The right most board was the first itteration of the power supply board. The latest revision incorporated an MOV that the firs one didn't have.
Anyway, enough of my rambling. I GREATLY appreciate your help.
Re: Creating some scene controller switches
Yes, all code snippets should go in a rules file (somewhat matters what order you put them, most often used rules should best be placed near the start of Rules 1 as that's the first file read, and processing stops after a matching rule is found). You can combine several rules (event handlers actually) in a single file, even if the editor starts to complain about the file size, that's no longer an issue. It's often just more convenient to split rules into several files.dbemowsk wrote: ↑31 Jul 2023, 05:02 A question about your 3 little code snipets. The first snipet says to "apply that on your switch handlers". I am not sure what you mean by that. Is this something I would put in a rule? The other two lok like they should also go in the rules. Does the last snipet just get pasted right after the second one in the rules? Also, on the last snippet I am going to assume this is what you meantwith SwitchA being one relay on the Sonoff, and SwitchB being the second relay. You had both as SwitchA in your example.Code: Select all
on SwitchA do
  gpio,27,%eventvalue1%
endon
on SwitchB do
  gpio,14,%eventvalue1%
endon
You did find a typo
/Ton (PayPal.me)
Re: Creating some scene controller switches
One tip when designing PCBs...
Make the current carrying traces wider.
So the GND net and 3V3/5V net should be made wider.
10 - 15 mil width is a good compromise between managable width and reduced voltage drop.
Make the current carrying traces wider.
So the GND net and 3V3/5V net should be made wider.
10 - 15 mil width is a good compromise between managable width and reduced voltage drop.
Re: Creating some scene controller switches
So just a little update on the progress. Since I needed to get a state sent to Home Assistant to indicate the on/off switch states for each row, and since I was using the LEDs as a visual indicator, I set the 4 LEDs up as devices tied to the GPIO pin they are connected to. I configured my MQTT controller and for each switch LED I checked the box "Send to Controller", therefore eliminating the need to handle the MQTT in the rules. As for controlling the LED, I just added a fourth value to your ChangeSwitch event variable, and then immediately after sending the command to the remote relay controller I set the LED GPIO pin to the same value sent to the relay device. Here is the new rules code.
My next question would be, what would be the best approach to the following dilema. I need it so when I turn a device on under Home Assistant, I will either need HA to control the scene controller switch LED's and then have that update the relay box as if a key was pressed on the keypad, or the other option would be to have HA control the relay box and then have that update the indicator on the scene controller. Looking for the cleanest approach.
Code: Select all
On keypad#ScanCode=17 Do
  event,"ChangeSwitch=31,A,0,5"
Endon
On keypad#ScanCode=18 Do
  event,"ChangeSwitch=31,A,1,5"
Endon
On keypad#ScanCode=33 Do
  event,"ChangeSwitch=31,B,0,4"
Endon
On keypad#ScanCode=34 Do
  event,"ChangeSwitch=31,B,1,4"
Endon
On keypad#ScanCode=49 Do
  event,"ChangeSwitch=32,A,0,3"
Endon
On keypad#ScanCode=50 Do
  event,"ChangeSwitch=32,A,1,3"
Endon
On keypad#ScanCode=65 Do
  event,"ChangeSwitch=32,B,0,2"
Endon
On keypad#ScanCode=66 Do
  event,"ChangeSwitch=32,B,1,2"
Endon

on ChangeSwitch do // 4 arguments: unit-number,'port',state,led gpio pin number
  if %eventvalue1% > 0
    SendTo,%eventvalue1%,"event,Switch%eventvalue2%=%eventvalue3%"
    GPIO,%eventvalue4%,%eventvalue3%
  endif
endonRe: Creating some scene controller switches
Hmm this does sound a bit complex to do it right.
Simply because you essentially have to keep the state synced on multiple locations.
And to make matters worse, the logic state may not be the same as the logic level of a pin (relay state).
You may want to have a look at the documentation of a plugin specifically made to keep these states in sync when using Domoticz:
https://espeasy.readthedocs.io/en/lates ... #p029-page
Just to get the idea of the possible complexity.
For Domoticz, what will happen if you don't use this "Domoticz helper" plugin is that the relay may start toggling continuously when its state differs from the state in Domoticz (e.g. when rebooting the node)
There are several use cases:
- Local button lets the relay toggle.
- Local button state is directly correlated to the relay state (switch "high", relay "high")
- Same as last, but inverted (switch "high", relay "low)
I don't know how the state is represented in HomeAssistant in your setup, but I assume it only has states like "high"/"low", or "on"/"off".
So when a state change is sent from HomeAssistant, it should just be sent to the relay and maybe inverted on the ESPEasy side.
But what to do when the state is changed locally by pressing the button? I guess the state in HomeAssistant should also be updated?
The best scenario I think is that there should be a single event handling block in the ESPEasy rules which should do the translation and sending back the logic state to HomeAssistant (this may be the inverse of the logic level of the relay)
Thus when pressing a button which should simply toggle the relay, you should get the logic level of the relay and send its inverse to the event handling block.
I think your current rules set is already working into that direction.
But you need to add a publish command where you also set the GPIO state to notify HomeAssistant of the new state.
Maybe you can check the GPIO state first to see if the new state actually differs from the current state and if it doesn't then don't call the GPIO command and don't send the publish message.
You can check for the current GPIO state like this:
Where "13" is the gpio number.
See: https://espeasy.readthedocs.io/en/lates ... task-names
Simply because you essentially have to keep the state synced on multiple locations.
And to make matters worse, the logic state may not be the same as the logic level of a pin (relay state).
You may want to have a look at the documentation of a plugin specifically made to keep these states in sync when using Domoticz:
https://espeasy.readthedocs.io/en/lates ... #p029-page
Just to get the idea of the possible complexity.
For Domoticz, what will happen if you don't use this "Domoticz helper" plugin is that the relay may start toggling continuously when its state differs from the state in Domoticz (e.g. when rebooting the node)
There are several use cases:
- Local button lets the relay toggle.
- Local button state is directly correlated to the relay state (switch "high", relay "high")
- Same as last, but inverted (switch "high", relay "low)
I don't know how the state is represented in HomeAssistant in your setup, but I assume it only has states like "high"/"low", or "on"/"off".
So when a state change is sent from HomeAssistant, it should just be sent to the relay and maybe inverted on the ESPEasy side.
But what to do when the state is changed locally by pressing the button? I guess the state in HomeAssistant should also be updated?
The best scenario I think is that there should be a single event handling block in the ESPEasy rules which should do the translation and sending back the logic state to HomeAssistant (this may be the inverse of the logic level of the relay)
Thus when pressing a button which should simply toggle the relay, you should get the logic level of the relay and send its inverse to the event handling block.
I think your current rules set is already working into that direction.
But you need to add a publish command where you also set the GPIO state to notify HomeAssistant of the new state.
Maybe you can check the GPIO state first to see if the new state actually differs from the current state and if it doesn't then don't call the GPIO command and don't send the publish message.
You can check for the current GPIO state like this:
Code: Select all
  if [Plugin#GPIO#Pinstate#13]=0
    ...

  endif
See: https://espeasy.readthedocs.io/en/lates ... task-names
Re: Creating some scene controller switches
TD-er
Thanks for all the input on this. The logic between the switch and the relay should be the same. I have the switch working with the relay so that when you press the on or off button for a row it changes the state of the LED and also sends the signal to the relay to turn it on or off. The state of the LED is then published to Home Asssistant through MQTT, and that all works. An option I thought of today was to have the Home Assistant side of it sync to the relay module through MQTT rather than the switch, and have the relay update the switch with a rule whenever the state of the relay changes. The relay would only need to update the logic of the GPIO that the LED is connected to to indicate whether the relay is on or off. Does that sound like it would be doable?
Thanks for all the input on this. The logic between the switch and the relay should be the same. I have the switch working with the relay so that when you press the on or off button for a row it changes the state of the LED and also sends the signal to the relay to turn it on or off. The state of the LED is then published to Home Asssistant through MQTT, and that all works. An option I thought of today was to have the Home Assistant side of it sync to the relay module through MQTT rather than the switch, and have the relay update the switch with a rule whenever the state of the relay changes. The relay would only need to update the logic of the GPIO that the LED is connected to to indicate whether the relay is on or off. Does that sound like it would be doable?
Re: Creating some scene controller switches
So here is my updated rule code that appears to work, for the most part.
The first bit with the ChangeSwitch event is what handles the keypresses from the matrix keypad. Then the "on ChangeSwitch do" just updates the state of the LED for whatever row the button was pressed on. The next section deals with the change in state for the LED. If it senses that the LED has changed state, it then updates the remote relay device. Being that the first part that handles the keypad events in the end changes the state of the LED, the next section picks up that state change and updates the relay accordingly. Likewise, when I have Home Assistant turn on or off one of the devices, it is just changing the state of the LED on the scene controller which in turn also fires the event to update the remote relay. The only issue I have to figure out is if the LED state and the remote relay state are on and if the scene controller reboots, the LED for whatever row on the scene controller shows as off, but the remote relay remains on putting the two out of sync.
Code: Select all
On keypad#ScanCode=17 Do
  event,"ChangeSwitch=5,0"
Endon
On keypad#ScanCode=18 Do
  event,"ChangeSwitch=5,1"
Endon
On keypad#ScanCode=33 Do
  event,"ChangeSwitch=4,0"
Endon
On keypad#ScanCode=34 Do
  event,"ChangeSwitch=4,1"
Endon
On keypad#ScanCode=49 Do
  event,"ChangeSwitch=3,0"
Endon
On keypad#ScanCode=50 Do
  event,"ChangeSwitch=3,1"
Endon
On keypad#ScanCode=65 Do
  event,"ChangeSwitch=2,0"
Endon
On keypad#ScanCode=66 Do
  event,"ChangeSwitch=2,1"
Endon

on ChangeSwitch do // 2 arguments: led gpio pin number,state
  if %eventvalue1% > 0
    GPIO,%eventvalue1%,%eventvalue2%
  endif
endon

On switch_1#State Do
  event,"ChangeState=32,A,[switch_1#State]"
Endon
On switch_2#State Do
  event,"ChangeState=32,B,[switch_2#State]"
Endon
On switch_3#State Do
  event,"ChangeState=31,A,[switch_3#State]"
Endon
On switch_4#State Do
  event,"ChangeState=31,B,[switch_4#State]"
Endon

On ChangeState Do
  If %eventvalue1%>0
    SendTo,%eventvalue1%,"event,Switch%eventvalue2%=%eventvalue3%"
  endif
EndonRe: Creating some scene controller switches
Just one remark...
You're calling "event" instead of "asyncevent".
Problem with "event" is that it will trigger a new rules parsing call, which may lead to higher memory usage and/or stack overflow when calling lots of events from events.
This can be problematic, specially on ESP8266.
However, when using asyncevent instead of event, the new event is added to the event queue and handled later.
This may be just the fix you need in some situations, but it may also cause issues as it does also introduce some delay when handling events.
So maybe what you did is just the best choice for this use case, but keep in mind this could lead to issues.
If it does, I would change the "event" into "asyncevent" when handling the events like "On switch_4#State Do" (and the others of those similar events)
Re: Creating some scene controller switches
The use of event was from the rules code suggestion from Ath. Is it just a matter of putting asyncevent instead of event? If that's all it is I will do it right now. Are event and asyncevent handled the same?
Re: Creating some scene controller switches
So this appears to work fine. Is this what you were referring to?
Code: Select all
On keypad#ScanCode=17 Do
  asyncevent,"ChangeSwitch=5,0"
Endon
On keypad#ScanCode=18 Do
  asyncevent,"ChangeSwitch=5,1"
Endon
On keypad#ScanCode=33 Do
  asyncevent,"ChangeSwitch=4,0"
Endon
On keypad#ScanCode=34 Do
  asyncevent,"ChangeSwitch=4,1"
Endon
On keypad#ScanCode=49 Do
  asyncevent,"ChangeSwitch=3,0"
Endon
On keypad#ScanCode=50 Do
  asyncevent,"ChangeSwitch=3,1"
Endon
On keypad#ScanCode=65 Do
  asyncevent,"ChangeSwitch=2,0"
Endon
On keypad#ScanCode=66 Do
  asyncevent,"ChangeSwitch=2,1"
Endon

on ChangeSwitch do // 2 arguments: led gpio pin number,state
  if %eventvalue1% > 0
    GPIO,%eventvalue1%,%eventvalue2%
  endif
endon

On switch_1#State Do
  asyncevent,"ChangeState=32,A,[switch_1#State]"
Endon
On switch_2#State Do
  asyncevent,"ChangeState=32,B,[switch_2#State]"
Endon
On switch_3#State Do
  asyncevent,"ChangeState=31,A,[switch_3#State]"
Endon
On switch_4#State Do
  asyncevent,"ChangeState=31,B,[switch_4#State]"
Endon

On ChangeState Do
  If %eventvalue1%>0
    SendTo,%eventvalue1%,"event,Switch%eventvalue2%=%eventvalue3%"
  endif
EndonRe: Creating some scene controller switches
Well they are not 100% handled the same... (otherwise there's no need to differentiate )
- "event" -> Handled immediately before processing the next line in the rules
- "asyncevent" -> Added to the event queue and handled later.
When to use "event"?
Use this when stuff done in the event is required immediately.
For example if an event sets a variable which is immediately being used later.
Or when lots of similar events might already be in the queue (e.g. acting on some frequently occuring event)
When not to use 'event' (thus use 'asyncevent')?
Calling "event" will start a new rules parser, thus using extra resources.
When events call other events, which call events... etc, you may cause crashes, rules parsing takes too long and you may never exit such a loop.
This can sometimes also be useful simply because it does cause a slight delay in event handling and if for some reason you end up in a loop of lots of the same event, the deduplication of same events ("same" means incl. their event values) may help you here to get out of this loop.
Re: Creating some scene controller switches
I switched to using all asyncevents and it seems to be working. The only time I could maybe see it being any kind of issue may be if there were a rapid press of keys on the keypad in direct succession, but in large part, that shouldn't happen. I'll see how it goes with it this way and if I experience issues, I'll try it with just using events and see if the behavior changes. This is being used as a simple wall mounted light switch controller, so rapid keypresses for the most part shouldn't be an issue. This weekend I hope to start the design of the PCB for the controller since the prototype seems to be working fine in all my bench tests so far. I am going to need about 6 of these for around the house as I do my changeover from my Vera controller to my new Home Assistant server.
Re: Creating some scene controller switches
Changing this to using %eventvalue1% might change behavior to applying each button-press in sequence, instead of using the state at the moment the event is _executed_ instead of _started_:
Code: Select all
On switch_1#State Do
  asyncevent,"ChangeState=32,A,%eventvalue1%"
Endon
/Ton (PayPal.me)
Who is online
Users browsing this forum: No registered users and 36 guests