Difference between revisions of "Tutorial building and uploading with platformio"
Grovkillen (talk | contribs) |
|||
| (26 intermediate revisions by 2 users not shown) | |||
| Line 2: | Line 2: | ||
Do you want to send your changes back to us, so they stay in ESPEasy and keep getting supported? | Do you want to send your changes back to us, so they stay in ESPEasy and keep getting supported? | ||
| − | * Yes: You’ll need to setup github as first. Follow this tutorial: [[Tutorial_preparing_to_work_with_github]] | + | * Yes: You’ll need to setup github as first. Follow this tutorial: [[Tutorial_preparing_to_work_with_github]] and get back here. |
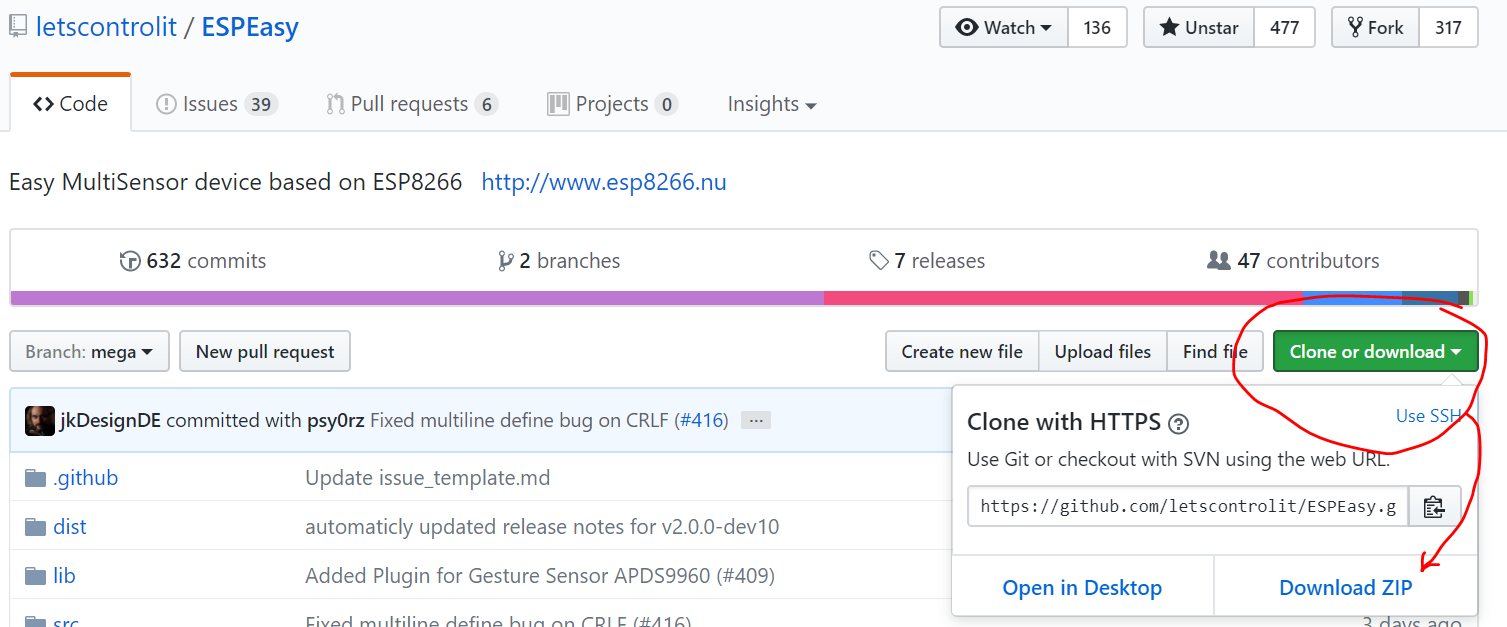
| − | * No: Just download the latest release zip-file here: https://github.com/letscontrolit/ESPEasy/releases and you | + | * No: Just download the latest release zip-file here: https://github.com/letscontrolit/ESPEasy/releases and continue this tutorial. Or if you want to download a none official version (in between releases) you can download it by clicking the "clone or download" button, see picture [[https://www.letscontrolit.com/wiki/images/5/51/DownloadZIPGitHub.PNG here]]. |
| + | |||
== Use the correct version == | == Use the correct version == | ||
| − | If you use git: Make sure you’ve checked out the correct branch. Currently you should use the mega-branch: | + | (skip this if you've just downloaded the .zip file) |
| + | |||
| + | * If you use git: Make sure you’ve checked out the correct branch. Currently you should use the mega-branch: | ||
[[File:Gitdesktop select mega.png]] | [[File:Gitdesktop select mega.png]] | ||
| Line 13: | Line 16: | ||
'''Note: If you forgot to change your default branch and then switch to the mega-branch, the submodules will not be cloned.''' Easiest is to change the default branch on github and clone it again. (dont forget to remove the local files) See: [[Tutorial_preparing_to_work_with_github]] | '''Note: If you forgot to change your default branch and then switch to the mega-branch, the submodules will not be cloned.''' Easiest is to change the default branch on github and clone it again. (dont forget to remove the local files) See: [[Tutorial_preparing_to_work_with_github]] | ||
| − | If you just download a release zip-file, make sure its v2.0.0-dev5 or later. | + | * If you just download a release zip-file, make sure its v2.0.0-dev5 or later. |
== Opening ESPEasy in Atom == | == Opening ESPEasy in Atom == | ||
| Line 31: | Line 34: | ||
Its important that you at least open one .ino file from the left. (otherwise platformio doesnt know which project to build) | Its important that you at least open one .ino file from the left. (otherwise platformio doesnt know which project to build) | ||
| − | The first time atom | + | The first time atom might complain about the Smart Code Linter. The codelinter makes coding easier so you could to install it. Make sure you either install it correctly or disable it. I was impatient and enabled it without installing the rest and that made Atom hang all the time. |
Now your atom editor should look like this: | Now your atom editor should look like this: | ||
| Line 40: | Line 43: | ||
No annoying tabs, just files on the left and one file open. | No annoying tabs, just files on the left and one file open. | ||
| − | == Building | + | == Building the correct version == |
| − | + | In order to get Platformio to start compiling the files you first need to have an Platformio account and also make sure that you are logged in via the Platformio interface in Atom. | |
| − | The list is a bit long but there is logic to it. | + | * Press F7 and you will get an overview of possible versions you can build: |
| + | [[File:Platformio environments.png]] | ||
| + | |||
| + | The list is a bit long but there is logic to it. | ||
| + | |||
| + | === Plugin sets === | ||
You can choose 3 types of plugin sets: | You can choose 3 types of plugin sets: | ||
| − | + | * ''normal_...'' Build only the normal stable plugins. | |
| − | + | * ''test_...'' Also include the plugins that are still in the testing stadium. These may have some problems, if so, please report them. In the web interface they will show up with [TESTING] | |
| − | + | * ''dev_...'' Also include plugins that are still in development. These are usually not finished, or still contain bugs. They will show up with [DEVELOPMENT] | |
| + | |||
| + | === Firmware size === | ||
| + | |||
| + | Currently there are 2 firmware sizes: | ||
| + | * ''..._1024'' For an esp8266 with 1Mbyte flash. | ||
| + | * ''..._4096'' For an esp8266 with 4Mbyte flash. | ||
| + | |||
| + | For example, select: ''PIO Build (dev_4096)'' or if you select "PIO Build" all the versions will be compiled in one run (4-5 minutes to compile them all). | ||
| + | |||
| + | When there are no errors continue with the [[Tutorial building and uploading with platformio#Uploading and serial monitoring|next step]]. | ||
| + | |||
| + | === Adding un-released plugins === | ||
| + | |||
| + | In order to compile your own firmware with extra (un-released) plugins you need to download them manually from the [https://github.com/letscontrolit/ESPEasyPluginPlayground playground GitHub] and extract them to the folder of the project. Make sure to download the '''.ino''' file from GitHub and place it together with the official plugins in the "src" folder. Depending on the definition set in the code you might need to either remove the code line of | ||
| + | |||
| + | #ifdef PLUGIN_BUILD_TESTING //at the very beginning | ||
| + | #endif //at the very end | ||
| + | |||
| + | or if it is set to development | ||
| + | |||
| + | #ifdef PLUGIN_BUILD_DEV //at the very beginning | ||
| + | #endif //at the very end | ||
| + | |||
| + | Or just pick the corresponding compiled version for your upload (next section). | ||
| + | |||
| + | == Uploading and serial monitoring == | ||
| + | |||
| + | |||
| + | * After building you can upload the firmware, also via the F7 menu. But instead of "PIO ''''Build''''..." you use, for example "PIO ''''Upload'''' (dev_4096)". | ||
| + | [[File:Platformio upload.png]] | ||
| + | |||
| + | |||
| + | When its done you have successfully build and flash your ESPEasy with platformio! \o/ | ||
| + | |||
| − | |||
| − | |||
| − | |||
| − | + | * To see what your ESP is doing go the ''Platformio'' menu and choose ''Serial monitor'' (Alt+Shift+M): | |
| + | [[File:Platformio serial monitor.png]] | ||
| − | + | * When you reset your ESP you should see something like this: | |
| + | [[File:Platformio serial output.png]] | ||
| − | + | Now you can fix issues or enhance ESP Easy yourself and upload and test the firmware! | |
| − | + | If you want to contribute back your changes look at this tutorial: [[Tutorial_Contributing_Back_To_ESPEasy]] | |
| − | |||
Latest revision as of 09:18, 4 February 2018
- First make sure you’ve installed platformio. Follow this tutorial: Tutorial_Install_Platformio
Do you want to send your changes back to us, so they stay in ESPEasy and keep getting supported?
- Yes: You’ll need to setup github as first. Follow this tutorial: Tutorial_preparing_to_work_with_github and get back here.
- No: Just download the latest release zip-file here: https://github.com/letscontrolit/ESPEasy/releases and continue this tutorial. Or if you want to download a none official version (in between releases) you can download it by clicking the "clone or download" button, see picture [here].
Contents
Use the correct version
(skip this if you've just downloaded the .zip file)
- If you use git: Make sure you’ve checked out the correct branch. Currently you should use the mega-branch:

Note: If you forgot to change your default branch and then switch to the mega-branch, the submodules will not be cloned. Easiest is to change the default branch on github and clone it again. (dont forget to remove the local files) See: Tutorial_preparing_to_work_with_github
- If you just download a release zip-file, make sure its v2.0.0-dev5 or later.
Opening ESPEasy in Atom
- If you’re using Github Desktop you can just click the Atom icon inside it:

- If you just downloaded and extracted the release zip-file, extract it somewhere. Start Atom manually and click File -> Open folder to open the Source thats inside the zip-file.
First time startup annoyances
The first time you need to close all the tabs and while you’re doing that pay attention to the checkboxes:
- Disable the welcome screen
- Disable the PlatforIO homescreen startup.
- Answer the telemetry question.
Its important that you at least open one .ino file from the left. (otherwise platformio doesnt know which project to build)
The first time atom might complain about the Smart Code Linter. The codelinter makes coding easier so you could to install it. Make sure you either install it correctly or disable it. I was impatient and enabled it without installing the rest and that made Atom hang all the time.
Now your atom editor should look like this:

No annoying tabs, just files on the left and one file open.
Building the correct version
In order to get Platformio to start compiling the files you first need to have an Platformio account and also make sure that you are logged in via the Platformio interface in Atom.
- Press F7 and you will get an overview of possible versions you can build:

The list is a bit long but there is logic to it.
Plugin sets
You can choose 3 types of plugin sets:
- normal_... Build only the normal stable plugins.
- test_... Also include the plugins that are still in the testing stadium. These may have some problems, if so, please report them. In the web interface they will show up with [TESTING]
- dev_... Also include plugins that are still in development. These are usually not finished, or still contain bugs. They will show up with [DEVELOPMENT]
Firmware size
Currently there are 2 firmware sizes:
- ..._1024 For an esp8266 with 1Mbyte flash.
- ..._4096 For an esp8266 with 4Mbyte flash.
For example, select: PIO Build (dev_4096) or if you select "PIO Build" all the versions will be compiled in one run (4-5 minutes to compile them all).
When there are no errors continue with the next step.
Adding un-released plugins
In order to compile your own firmware with extra (un-released) plugins you need to download them manually from the playground GitHub and extract them to the folder of the project. Make sure to download the .ino file from GitHub and place it together with the official plugins in the "src" folder. Depending on the definition set in the code you might need to either remove the code line of
#ifdef PLUGIN_BUILD_TESTING //at the very beginning
#endif //at the very end
or if it is set to development
#ifdef PLUGIN_BUILD_DEV //at the very beginning
#endif //at the very end
Or just pick the corresponding compiled version for your upload (next section).
Uploading and serial monitoring
- After building you can upload the firmware, also via the F7 menu. But instead of "PIO 'Build'..." you use, for example "PIO 'Upload' (dev_4096)".

When its done you have successfully build and flash your ESPEasy with platformio! \o/
- To see what your ESP is doing go the Platformio menu and choose Serial monitor (Alt+Shift+M):

- When you reset your ESP you should see something like this:

Now you can fix issues or enhance ESP Easy yourself and upload and test the firmware!
If you want to contribute back your changes look at this tutorial: Tutorial_Contributing_Back_To_ESPEasy