Difference between revisions of "LCDDisplay"
| Line 25: | Line 25: | ||
Enter template texts into lines 1 to 4. Plain text will be shown on the display exactly as entered. | Enter template texts into lines 1 to 4. Plain text will be shown on the display exactly as entered. | ||
| − | If you want to show a value, enclose task name and value name between brackets, separated by a hashtag. | + | If you want to show a value, enclose <task name> and <value name> between brackets, separated by a hashtag. |
So if you have a dallas sensor running, with taskname "Dallas", to get the temperature value, use this: | So if you have a dallas sensor running, with taskname "Dallas", to get the temperature value, use this: | ||
Revision as of 15:24, 11 October 2015
Contents
Introduction
The ESP8266 module can be used to control an I2C LCD Display.
Hardware

Connect the LCD Display to the I2C interface. This display works with 5 volt VCC, but the I2C connections should be "floating". The 2004 display from "Funduino" that we used in our testlab could be connected without levelshifters.
Connections
WARNING: Some LCD Modules might have pullup resistors to 5 volts VCC. In that case a levelshifter should be used
 LCD 	 	ESP-01
 GND 	 	GND
 VCC    	-
 SDA		GPIO 0
 SCL		GPIO 2
Software
Custom sketch
ESP Easy
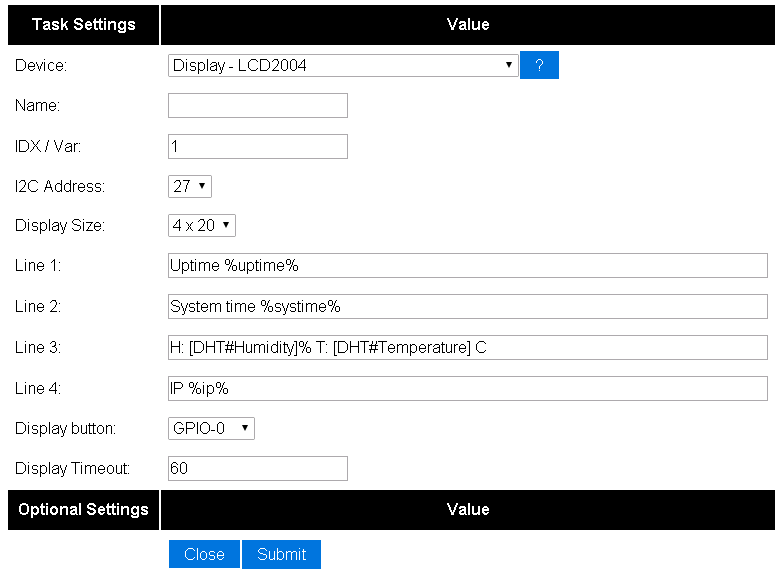
Use the device tab on the ESP Easy webinterface and create a new task by editing one of the available tasks. Select "LCD Display" from the dropdown box.
Enter template texts into lines 1 to 4. Plain text will be shown on the display exactly as entered. If you want to show a value, enclose <task name> and <value name> between brackets, separated by a hashtag.
So if you have a dallas sensor running, with taskname "Dallas", to get the temperature value, use this:
[Dallas#Temperature]
Check this sample on how to get it done:

ESP Connexio
Command:
LCDI2CWrite <line>,<column position>, <data command>, <data option>
| Parameter: | Description: | Range: | Comments: |
|---|---|---|---|
| Line | Linenumber | 1-2 (of 1-4) | |
| Column | Column position | 1-16 (1-20) | |
| data command | Message, Clock, IP, PortInput, Variable, Event | ||
| data option | In case of Message: label id of text to be shown | Message:1-20 |
Sample
LCDWrite 1,1,Message,1